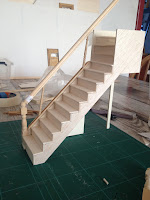
I knew I still had some work to do, especially since I didn't know at the time how to do the handrail and balustrade.
After I put the cottage together again last week, I spend some time researching that. There was the fact that the stairs consisted of different parts of previous made stairs and definately looked that way. Also I figured that the staircase didn't need a turn on the bottom any more ;)
I decided to make a new staircase (a) You already figured that out, didn't you? ^^
While I was at it, I thought about the space under the staircase. Being a huge Harry Potter fan, it wasn't hard to come up with an idea. A nice cupboard under the stairs with storage space for Bianca, as a wink to the Boy Who Lived ;)
 |
| Set photo by www.catterflyworx.com |
So, after taking some measurements and checking and double checking I started all over.
I've used plywood for the side where the door will be. It's the same 4 mm plywood that I've used for all the cottage walls. The other side, which will be glued to the wall between the entrance hall and the kitchen, is 3 mm Balsa.
Just checking if the opening is still wide enough for the new stairs :)
The treads and risers are 2,5 mm Balsa. Most of the risers are already glued in place. The turn at the top was the hardest. And I needed to figure out where the bannister on the bottom of the staircase should be.
I'd brought some spindle, bannisters, handrail etc at WAM miniaturen, which arrived soon.
Now I have a better understanding of how to do the handrail and the ballustrade, though I've decides not to make it before I'll have checked if the staircase fit 100% next week :) That's when the walls will be glued together. Yay ;)
Next I experimented with colours and structures for that wall. Top is a mix of grey structure with plain white paint, middle the same with a bit of bird sand for more structure, and the bottom one has a bit bit of azure blue paint added.
Eventhough I liked the bottom one very much, it might be a bit too much structure for the small wall and door, so I've chosen the one at the top.
But I'll keep the other in mind, maybe for an outside wall?
I finished it off with some Balsa slats (1,5 mm), oak stained, and a door knob.
Maybe I'll decide later to do some aging on the wall, but for now I'm very happy with the result. Let's keep my fingers crossed that the staircase will fit perfectly between the other walls.
Monday my dad will come help me so the walls can finally be fixed in place. Very exciting and also a bit worrying (a)


No comments:
Post a Comment